This document provides a comprehensive guide to setting up a metered proxy server. Proxy servers allow anonymous internet access through an intermediary server and are widely used for various tasks such as testing, bypassing geo-blocks, or protecting privacy.
This guide covers all stages of setting up a proxy server, from basic settings to advanced features like targeting and IP rotation.
Step 1: Basic Proxy Settings
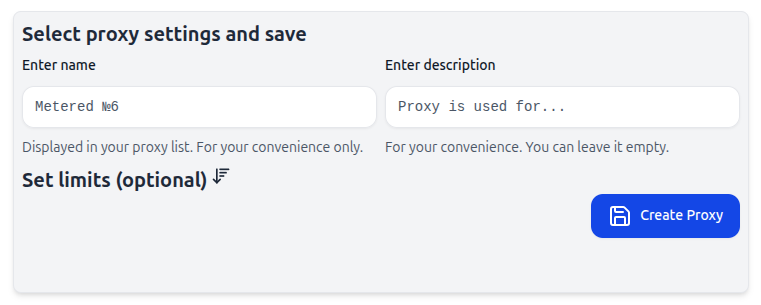
1. Proxy Name
What it is: A unique name for your proxy server (e.g., “ProxyServer1”).
Why it’s needed: Helps to easily identify and manage multiple proxy servers, especially when you have a large number.
2. Proxy Description (optional)
What it is: A textual description of the proxy’s purpose, such as “Google Ads Testing” or “Hiding Real IP”.
Why it’s needed: Useful for quickly understanding the proxy’s intended use, especially in a team environment.
3. Limits
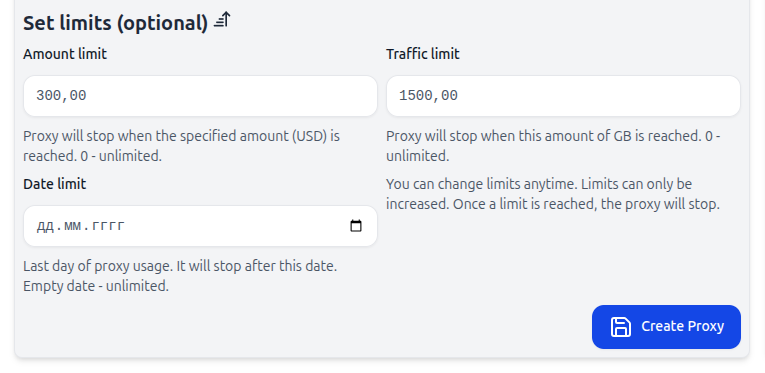
Cost Limit
What it is: The maximum amount after which the proxy will be automatically disabled (e.g., 10 USD).
Why it’s needed: Helps control expenses and prevent unexpected costs.
Traffic Limit
What it is: Defines the maximum amount of traffic after which the proxy will stop working (e.g., 10 GB).
Why it’s needed: Ideal for testing or tasks with limited resources.
Date Limit
What it is: Sets an end date after which the proxy will automatically stop.
Why it’s needed: Suitable for temporary tasks or short-term projects.
Step 2: Targeting and IP Rotation
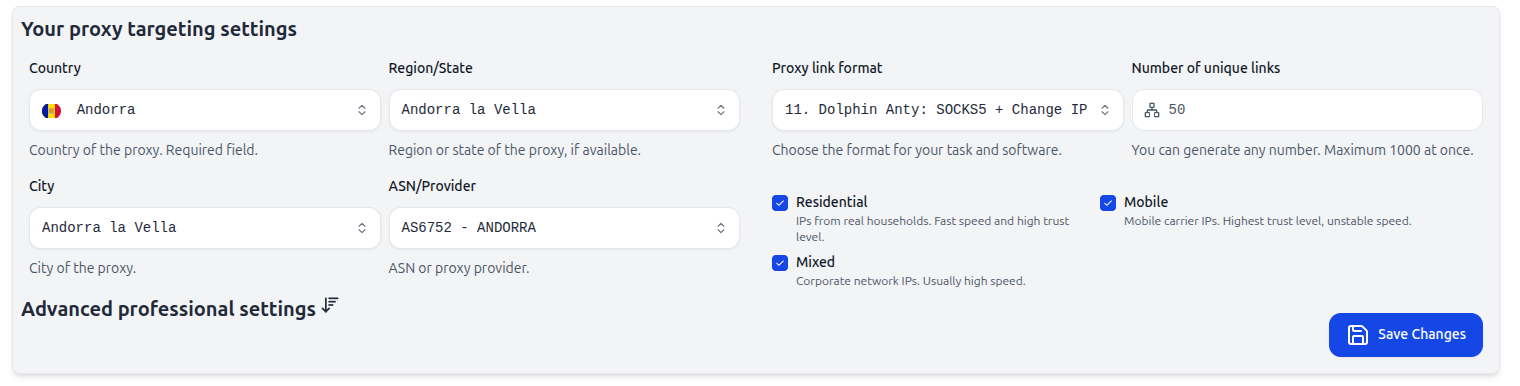
1. Country
What it is: Choose the country where the proxy will be used (e.g., Germany).
Why it’s needed: Determines the geographic region for the IP addresses, which is crucial for localized traffic needs.
2. Region/State
What it is: Specifies a more precise location within the selected country (e.g., California).
Why it’s needed: Useful for localized tests or tasks where geographic precision is necessary.
3. City
What it is: Specifies the city (e.g., Moscow or New York).
Why it’s needed: Important for testing services that depend on precise city-level targeting.
4. ASN/Provider
What it is: Choose the ASN (Autonomous System Number) or internet service provider for the proxy.
Why it’s needed: Allows selecting IPs from a specific provider to increase reliability or speed.
5. Proxy Link Format
What it is: The proxy link format required by your software (e.g., socks5://login:password@host:port).
Why it’s needed: Ensures proper functionality of the proxy connection with your system.
6. Number of Unique Links
What it is: Defines how many unique proxy links to generate.
Why it’s needed: Useful for parallel connections, where each proxy link will have a unique outbound IP.
Important: Don’t create a new proxy server if you just need to change targeting. Instead, modify the settings of the existing proxy, and old links will remain functional until the password is changed.
7. Outbound IP Type
What it is: Choose the outbound IP type:
- Mobile: IPs from mobile carriers, offering high anonymity but potentially unstable speeds.
- Residential: IPs from real households, offering high speed and reliability.
- Mixed: IPs from corporate networks, ideal for handling large data volumes at high speeds.
Why it’s needed: The IP type you choose depends on your goals: mobile or residential IPs are better for anonymity and privacy, while corporate IPs are ideal for high-speed, large-scale data work.
Advanced Settings
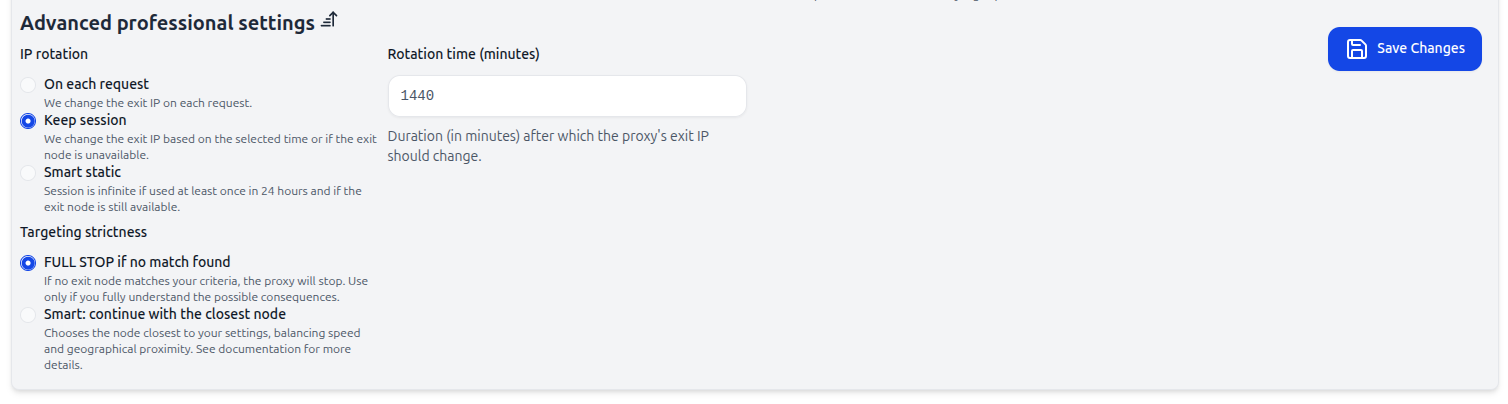
1. IP Rotation
What it is: Set how often the outbound IP changes:
- Per request: Each new request will use a new IP.
- Session keep: IP changes after a set number of minutes or if the current IP becomes unavailable.
- Smart static: IP changes if the session is inactive for more than 24 hours or if the outbound node is unavailable.
Why it’s needed: IP rotation helps avoid blocking and prevents tracking of your activity.
2. Targeting Strictness
What it is: The level of precision for proxy node selection:
- FULL STOP if not found: The proxy stops if a matching node is not found.
- Smart: continue with the closest node: If the ideal node is not found, the system will use the closest available node, creating the illusion that the user simply switched, for example, from mobile data to Wi-Fi or visited a neighbor’s house.
Why it’s needed: Essential for bypassing advanced anomaly detection systems. We don’t recommend using the full stop option unless you’re confident in your actions.
Proxy Link Generation
After configuring all the settings, the system will generate a proxy link that might look like this:
socks5://zFqZ6e-iso-ad-r-3041566-c-3041563-asn-6752-t-mrv-st-1440-tt-s-s-4rPBmF9zd:JtD0Wp@example.com:9090
Breakdown of the Proxy Link:
- zFqZ6e — Unique identifier for the proxy.
- iso-ad — Country (e.g., “iso” for the international standard).
- r-3041566 — Region identifier.
- c-3041563 — City identifier.
- asn-6752 — ASN number.
- t-mrv — Proxy type (m - mobile, r - residential, v - mixed).
- st-1440 — Session time in minutes.
- tt-s — Targeting type (strict).
- s-4rPBmF9zd — Random session string.
- JtD0Wp — Proxy password.
- example.com — Host.
- 9090 — Port.
Changing the Password
Important: When changing the proxy password, all old links will only work with the new password. You can change the password through the management interface.
Changing the Outbound IP
After creating the proxy link, you’ll receive a URL for changing the outbound IP. To change the IP, send a GET request to the provided URL. The URL format is:
https://api-url/changeip/proxy-id/session, where:
proxy-id— Unique proxy identifier (e.g.,zFqZ6e).session— Session identifier (e.g.,4rPBmF9zd).
Example request for IP change:/changeip/zFqZ6e/4rPBmF9zd
Proxy Testing
Before using the proxy for large tasks, be sure to test it through the interface. Important: Test the proxy and report any error codes to technical support if displayed. This will help speed up the troubleshooting process.
Conclusion
This guide provides detailed steps for creating and configuring a metered proxy server. We’ve covered all the possible settings so you can configure your proxy for any task, whether it’s testing, hiding your real IP, or other purposes. If you encounter any issues or have questions, feel free to contact technical support.
Ready to test with real IPs?
Register now to get immediate access to our proxy pools.